Gemologists Identify Real Gemstones
You know that feeling when you’re drawn to a beautiful gemstone, but something in the back of your mind whispers, “Is this really what it claims to be?” You’re not alone in that uncertainty. Figuring out whether a gemstone is genuine or fake used to feel like an impossible puzzle, especially when you’re just starting to learn about gems. Think about itnatural gemstones spend thousands or even millions of years forming deep within the earth, while their laboratory cousins can be created in weeks, making them surprisingly difficult to tell apart.
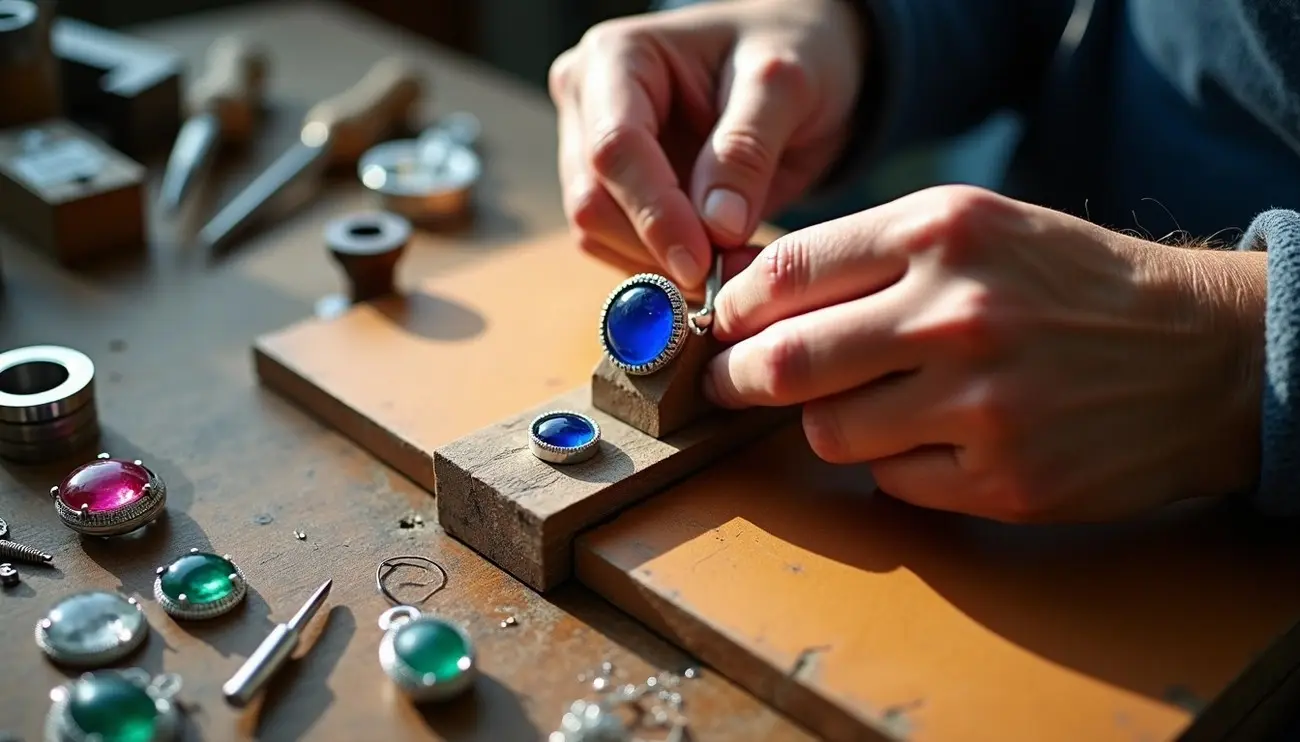
Here’s what gives me hope for anyone curious about gemstones: genuine gems like diamonds and rubies carry their own unique fingerprints tiny inclusions and distinctive compositions that are nearly impossible to fake perfectly. Professional gemologists have developed a toolkit of identification methods, from simple visual checks to detailed microscope work and specialized testing equipment. That trusty 10x gem loupe you might see jewelers using? It’s actually the international standard for gem grading, and it’s more powerful than you might think.
What makes a gemstone valuable goes beyond just looking pretty. Size matters, sure, but so does the depth and richness of color, how clear the stone appears without visible flaws, and whether the cut brings out the stone’s natural brilliance. While becoming a gemstone expert takes years of training, learning the basics of how professionals approach identification can save you from costly mistakes and help you feel confident about your jewelry choices.
Throughout this guide, I’ll walk you through the same techniques and tools that professional gemologists use every day. We’ll start with simple visual clues you can spot yourself and work our way up to the sophisticated scientific methods that reveal a stone’s true story. Think of it as your introduction to the detective work that happens behind every gemstone authentication.
How Gemologists Identify Original Gemstones in Diploma Gemology Courses
When you watch a professional gemologist at work, you’re seeing years of systematic training in action. Their education through diploma gemology courses teaches them to spot the tiny details that separate genuine gems from clever imitations. It’s like learning a secret language written in light, color, and crystal structure one that reveals the true story of every stone.
Color Depth and Variation in Gemstone Identification
Color becomes your first clue in the gemstone detective game, but it’s more complex than you might expect. Professional gemologists break color down into three key elements: the hue (what color you actually see), the tone (how light or dark it appears), and the saturation (how pure and intense that color feels). What makes this tricky is how dramatically these qualities can shift under different lighting conditions.
Here’s where professional training really shows. GIA gemologists master several lighting techniques that reveal hidden truths:
- Darkfield illumination makes tiny inclusions pop into view like stars against a night sky
- Diffused lighting exposes color zoning patterns that might otherwise hide
- Reflected light brings surface features into sharp focus
- Fiber-optic lighting can be positioned at any angle for detailed examination
- Polarized light reveals optically aligned inclusions and internal strain patterns
One telling sign that professionals learn to spot is color zoning those subtle variations in color distribution throughout a gemstone. Natural gems often show these uneven patterns because of their complex formation deep in the earth. Laboratory-created stones, however, tend to display suspiciously perfect color distribution, almost too uniform to be natural.
The spectroscope adds another layer of detection. This tool reveals how a gemstone absorbs specific wavelengths of light, creating what gemologists call an absorption spectrum. Each gemstone type produces its own characteristic pattern of dark lines like a fingerprint that’s nearly impossible to fake. Students in advanced gemology programs learn to read these spectral signatures like a roadmap to identification.
Inclusions and Imperfections in Original Gemstones
Back in the 1940s, a gemologist named Edward J. Gübelin changed everything when he proved that inclusions those tiny imperfections inside gems could actually identify them. These microscopic features tell the complete story: where a gem formed, how it developed, whether it’s been treated, and most importantly, whether it’s natural or laboratory-created.
Natural gemstones carry their formation history inside them like a diary. You’ll find mineral crystals that grew alongside the gem, tiny pockets of ancient fluids trapped millions of years ago, and healing fractures that tell of the earth’s movements. Emeralds often contain what gemologists fondly call “jardins” (gardens) inclusions that look like tiny plants. Sapphires might show silk-like rutile needles that create their own beauty within the stone.
Professional gemologists learn to identify several types of inclusions:
- Crystalline inclusions – Other minerals that became trapped during formation
- Liquid inclusions – Ancient water, brine, or carbon dioxide preserved in tiny bubbles
- Gas inclusions – Pockets of gases like carbon dioxide or methane
- Healing fractures – Cracks that partially sealed themselves, creating feather-like patterns
- Fingerprint inclusions – Unique spiral patterns from healed fractures
What’s fascinating is how these inclusions separate natural from synthetic gems. A stone that formed over millions of years carries distinctive inclusion patterns, while laboratory-created gems often show completely different characteristics or suspiciously few inclusions. Examining these features under magnification can also reveal treatments like heat enhancement or fracture filling that affect a stone’s value.
Surface Features Like Bubbles or Scratches in Gemstones
The story doesn’t end with what’s inside a gemstone the surface holds its own secrets. Professional gemologists examine every external detail for natural growth marks, manufacturing clues, or signs of treatment. This requires magnification up to 50 times normal vision to catch details your eyes would miss.
Surface bubbles can immediately flag synthetic origin or composite construction. Meanwhile, natural surface patterns like the distinctive etch marks found on aquamarine crystals serve as nature’s own authentication marks. Unlike internal inclusions, some surface features can be spotted with just a standard 10× jeweler’s loupe, making them accessible to careful observers.
The way a gem breaks or fractures also tells a story. Natural gems might show curved, shell-like fracture patterns that reveal information about their crystal structure and hardness. Students learn to distinguish between wear patterns that develop naturally over time versus artificial treatments applied in the laboratory.
Surface examination becomes especially important for detecting treatments. Fracture filling, where resins are used to mask cracks, often leaves telltale patterns around the treated areas. These details significantly impact both the gem’s value and how it should be classified in the market.
Even the quality of a stone’s polish provides authentication clues. Genuine gemstones typically exhibit a distinctive luster and light reflection that’s hard to replicate in imitations. When gemologists combine their observations of surface features with internal characteristics and color properties, they build a complete case for a stone’s identity like assembling pieces of a puzzle that reveals the truth.
Hands-On Testing Methods That Really Work
Once you’ve learned to spot the visual clues, the next step takes you into the world of physical testing. This is where gemology students really start building confidence because numbers don’t lie, and physical properties give you concrete proof of what you’re looking at.
What Temperature and Weight Can Tell You
Ever picked up a genuine gemstone and noticed how surprisingly cool it feels against your skin? That’s your first clue right there. Natural gemstones conduct heat away from your body much faster than glass or plastic imitations, which is why they feel cooler to the touch. This simple observation has helped countless gem enthusiasts make their first accurate identification.
Professional gemologists take this concept much further with thermal conductivity testers. These handy devices measure exactly how fast heat moves through a stone, helping you tell the difference between materials that might look identical. Take diamonds and moissanite, for example they can appear nearly identical to the naked eye, but their thermal properties are completely different.
But here’s where it gets really interesting: every gemstone has its own specific gravity, which is essentially how heavy it is compared to water. Ruby and sapphire (both forms of corundum) tip the scales at about 4.0 times heavier than water, while diamond comes in at 3.52. These aren’t just random numbers they’re reliable identifiers that help separate lookalikes.
The traditional way to measure specific gravity involves a simple but clever technique called hydrostatic weighing:
- Weigh your stone in air first
- Then weigh it while it’s suspended in water
- Apply a basic formula to get your answer
Some gemologists prefer the heavy liquid method, where stones are placed in special liquids of known density. Watch what happens does it float, sink, or hover somewhere in between? Each reaction tells you something specific about the stone’s density range.
Why Experienced Jewelers Can “Feel” the Difference
You might wonder how experienced jewelers can sometimes identify a stone just by holding it. The secret lies in developing what we call “hand memory” a learned sense of how different materials feel when you handle them.
Cubic zirconia, a popular diamond substitute, weighs about 1.7 times more than a real diamond of the same size. Once you’ve handled both materials enough times, that difference becomes unmistakable. Your hands literally learn to recognize authentic stones.
Professional gemologists combine weight with precise measurements taken with digital calipers. When you know both the weight and the exact dimensions, you can calculate density and density rarely lies about a stone’s identity.
Here’s a quick check that works surprisingly well: if a supposed 1-carat diamond looks much bigger or smaller than you’d expect for its weight, something’s probably not right. This technique becomes especially useful when you’re examining stones that are already set in jewelry, where your testing options might be limited.
The Scratch Test and What Surfaces Reveal
Hardness testing gives you some of the most definitive answers in gemstone identification. The Mohs scale runs from 1 (soft as talc) to 10 (hard as diamond), and where a stone falls on this scale tells you a lot about what you’re dealing with.
The process is straightforward: try scratching your unknown stone with materials of known hardness. A genuine ruby (hardness 9) will easily scratch quartz (hardness 7) but won’t put a mark on diamond (hardness 10). Just remember to test in an inconspicuous spot you don’t want to damage a beautiful stone while trying to identify it.
Surface examination reveals another layer of information. Natural gemstones often display characteristic growth patterns that lab-created stones struggle to replicate perfectly. Natural corundum might show tiny triangular marks from its crystal growth, while synthetic versions usually lack these telltale features.
What I find fascinating is how students develop both visual and tactile memory for different stone types through practice. After handling hundreds of samples, your fingers start recognizing subtle texture differences that your eyes might miss. This hands-on experience becomes invaluable when you encounter questionable stones later on.
If you’re interested in jewelry design, understanding these physical properties becomes doubly important. Knowing which stones can be safely set together without scratching each other, or which gems can handle the stress of certain mounting styles, directly influences your creative choices. Good testing knowledge serves both authentication and practical design needs.
Essential Tools Every Gemstone Enthusiast Should Know About

Think of gemological tools as extensions of your senses they help you see, feel, and understand things about gemstones that would otherwise remain hidden. When you watch a professional gemologist at work, their confidence comes from years of practice with these specialized instruments. Each tool serves a specific purpose, and together they create a complete picture of what you’re really looking at.
Your First Look: Loupes and Microscopes
Most gemologists will tell you their relationship with tools started with a simple jeweler’s loupe. This small, portable magnifier becomes like a trusted companion small enough to carry anywhere, yet powerful enough to reveal a gemstone’s secrets. The 10x loupe remains the standard because it strikes the perfect balance: strong enough magnification to see important details without being so powerful that it becomes difficult to use.
You’ll find loupes come in three main types. Single lens versions work fine for basic viewing, but doublet loupes (with two lenses) reduce distortion significantly. Triplet loupes, with their three-lens design, give you the clearest, most color-accurate view possible by eliminating both distortion and those rainbow edges that can fool your eyes.
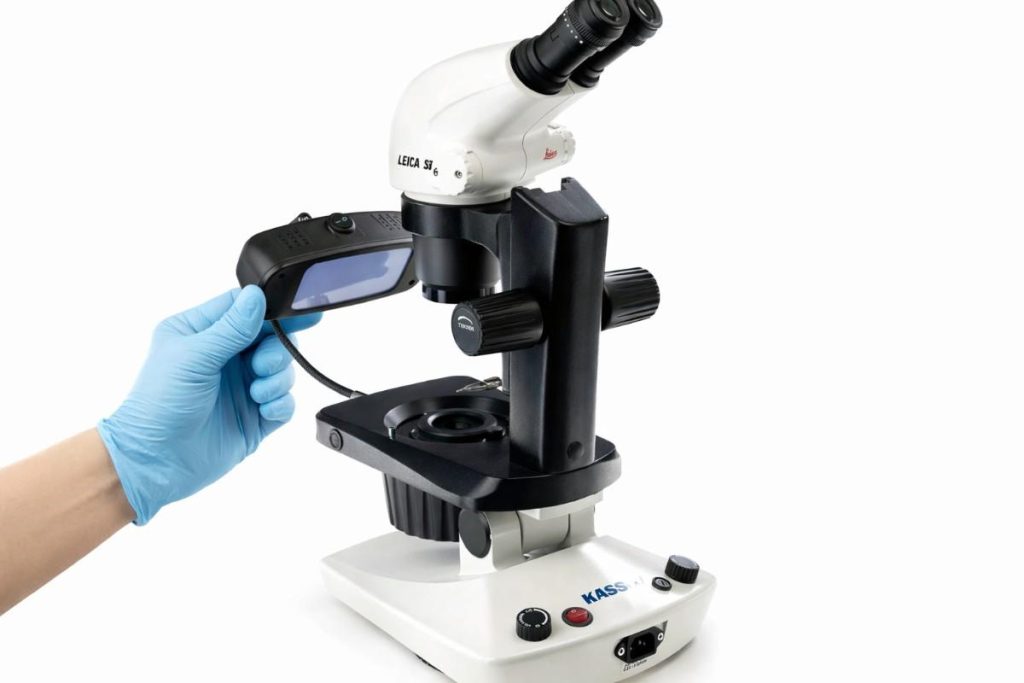
When you’re ready to step up your game, gemological microscopes open up an entirely new world. Unlike the microscopes you might remember from school science class, these specialized instruments let you see in three dimensions crucial when you’re trying to understand the depth and positioning of inclusions inside a stone. Most gemological microscopes work in the 10x to 60x range, which might sound modest compared to laboratory equipment that can magnify 1000x, but this range hits the sweet spot for examining jewelry.
What makes these microscopes special are their gemstone-specific features:
- Darkfield lighting that makes tiny inclusions pop out like stars in a dark sky
- Diffused lighting that shows surface scratches and polish quality
- Polarizing filters that reveal hidden strain and optical properties
- A rotating stage that lets you examine every angle without touching the stone
Sometimes the tiniest inclusion visible only under magnification becomes the key clue that separates a natural gem from its laboratory-created twin.
Modern Testing: Diamond Testers and Advanced Screening
The diamond market has become more complex in recent years, with laboratory-grown diamonds and sophisticated simulants appearing alongside natural stones. Modern gemologists rely on specialized testing equipment that can sort through this complexity quickly and accurately.
Basic diamond testers work by measuring how heat or electricity moves through a stone. Most professionals prefer electrical conductivity testers because they can tell the difference between diamonds and moissanite something that stumped earlier thermal testers. However, these basic instruments face a limitation: laboratory-grown diamonds have identical physical properties to natural diamonds, so standard testers can’t distinguish between them.
This challenge led to more sophisticated screening devices like the GIA iD100®, which uses fluorescence spectroscopy instead of simple heat or electrical tests. The device gives you an answer in just two seconds either “Pass” for natural diamonds or “Refer” for stones that need additional testing. Its precision probe can test diamonds as small as 0.9mm, which means you can examine stones even when they’re already set in finished jewelry.
Recent developments in laboratory-grown diamond production have created new testing challenges. Some newer lab-grown diamonds contain higher levels of boron, which can confuse certain UV-based testers and cause them to give misleading results. Because of these evolving challenges, most gemology programs now recommend using multiple testing technologies rather than relying on a single instrument.
Spectroscopy and Density Testing: The Science Behind Authentication
Spectroscopes represent some of the most powerful identification tools available to gemologists. These instruments analyze how gemstones interact with light, showing you which wavelengths get absorbed and which get reflected. The resulting pattern works like a fingerprint each type of gemstone creates its own unique spectral signature.
Modern gemology labs use several types of spectroscopic analysis:
- UV-Vis-NIR spectrometers that detect characteristic light absorption patterns
- FTIR spectrometers that identify materials and detect treatments
- Raman spectrometers that compare unknown stones against extensive databases
Specific gravity testing provides another crucial piece of the identification puzzle. This measurement compares a gemstone’s density to water essentially telling you how much heavier the stone is than an equal volume of water. Gemologists calculate this using Archimedes’ principle: they weigh the stone in air, then weigh it again while it’s suspended in water, and use a simple formula to determine the specific gravity.
One practical approach uses heavy liquids with known densities. Drop a stone into the liquid, and its behavior tells the story it floats if it’s lighter than the liquid, sinks if it’s heavier, or hovers suspended if the densities match. The speed of sinking or floating gives you additional clues about how much the specific gravity differs from the liquid.
Safety becomes critical when working with heavy liquids, though. Most of these substances are toxic and should never touch your skin or be inhaled. They also pose fire hazards, so proper handling procedures and safety training are essential parts of any professional gemology education.
Mastering these tools gives gemologists the technical expertise they need to make confident identifications and quality assessments skills that prove invaluable whether you’re building a career in the jewelry industry or simply want to make informed decisions about your own gemstone purchases.
Scientific Methods Covered in Gemstones Design Courses in Bangalore

Here’s where gemstone identification gets really interesting when you step into the world of scientific testing. Professional gemology education teaches you to move beyond educated guesses and into the realm of precise measurement. These standardized scientific methods give you concrete proof of what you’re looking at, not just an opinion based on appearance.
Mohs Hardness Scale in Gemology Courses
Think of the Mohs hardness scale as your gemstone’s report card for toughness. Friedrich Mohs created this brilliant system back in 1812, and it’s still the go-to method for measuring how well a mineral resists scratching. The scale runs from 1 (talc, which you can scratch with your fingernail) to 10 (diamond, which laughs at most attempts to mark it).
Students learning gemstone design quickly discover that hardness testing is like solving a puzzle. You take materials of known hardness and see what can scratch what. But here’s something that surprises many newcomers—the scale isn’t evenly spaced. The jump from corundum at 9 to diamond at 10 represents a huge leap in actual hardness, much bigger than the difference between talc at 1 and gypsum at 2.
Diamond earns its place at the top of the scale, making it one of the hardest substances we know. That’s why your diamond rings can last generations with proper care. But remember, hardness isn’t the same as toughness a diamond can still chip if you hit it just wrong. Students practice with reference minerals like quartz (7), topaz (8), and corundum (9) until they develop an instinct for how different stones behave.
What makes this scale so valuable is that you don’t need fancy equipment to use it. When you’re examining jewelry with multiple stones, hardness testing gives you a quick way to sort out what you’re dealing with.
Light and Fluorescence Analysis in Jewelry Design Courses in India
Have you ever been to a party with black lights and noticed how certain things glow? Gemstones can do something similar, and it’s one of the coolest identification tricks you’ll learn. When some gems absorb ultraviolet light, they emit visible light back that’s fluorescence. About 15% of minerals show this fascinating behavior, making it a surprisingly useful way to identify stones.
Students learn to work with two types of UV light:
- Longwave UV (365nm wavelength) – the safer option
- Shortwave UV (254nm wavelength) – more revealing but requires extra eye protection
Diamonds often tell their own story under UV light. Many will glow blue under longwave UV, then continue glowing yellow for a moment after you turn the light off—that’s called phosphorescence, and it’s particularly common in Type Ia diamonds. The beauty of fluorescence testing is its speed and versatility. You can check loose stones, mounted gems, rough crystals, or polished pieces all at once, and it takes less than a minute.
What creates these glowing effects? Certain elements act like tiny lightbulbs when hit with UV rays. Chromium, uranium, manganese, lead, titanium, and rare earth elements can make gems fluoresce, while iron and nickel work like dimmer switches, often preventing any glow at all. The key to accurate testing is simple: darken the room and place the stone table-down for the clearest results.
Heat and Water Tests for Gemstone Density
Specific gravity testing sounds complicated, but it’s really just a fancy way of asking, “How heavy is this stone compared to water?” Water gets a score of 1, and everything else gets measured against that standard. Stones heavier than water sink; lighter ones float. Simple as that.
The traditional approach uses something called hydrostatic weighing—you weigh the stone in air, then weigh it again while it’s hanging in water, and do some basic math to find the ratio. There’s also a quicker method using special liquids of known density. Drop a stone in, and its behavior tells you immediately whether it’s heavier, lighter, or the same density as the liquid.
This method becomes invaluable when you’re working with delicate antique pieces that you can’t afford to scratch or damage. Plus, synthetic gems sometimes have slightly different densities than their natural counterparts due to how they’re manufactured, giving you another clue in your detective work.
These scientific methods might seem basic compared to high-tech equipment, but they form the foundation of reliable gemstone identification. Throughout jewelry design courses in Bangalore, students discover that combining these objective measurements with visual skills creates a complete picture of what they’re examining.
Why Certification Matters More Than You Think
Think of gemstone certification as the ultimate peace of mind. After all the visual checks, testing, and scientific analysis we’ve talked about, certification brings everything together into one authoritative document that says, “Yes, this stone is exactly what it claims to be.” With online gem buying becoming so popular over the past decade, having that official stamp of approval has become absolutely essential for both professionals and everyday buyers.
What You’ll Actually Find in a Gemological Certificate
A gemological certificate works like a detailed ID card for your gemstone. When you receive one, you’re getting a complete picture of what you own. Here’s what these certificates typically include:
- Clear identification of the stone’s species and variety based on its chemical makeup
- Precise measurements and dimensions
- Thorough evaluation of color, clarity, cut quality, and exact carat weight
- Full disclosure of any treatments like heating or fracture filling
- Origin information when it can be determined
- Documentation of unique characteristics that make your stone one-of-a-kind
- Detailed diagrams showing exactly where inclusions appear inside the stone
This paperwork becomes your strongest defense against getting something you didn’t pay for. When you buy certified gemstones, you’re getting stones that have been put through the same rigorous testing processes that professional gemologists learn in their training.
The Labs You Can Trust: GIA and IGI
When it comes to gemstone certification, the Gemological Institute of America (GIA) sits at the top of the mountain. Their reputation for consistent, unbiased grading has made GIA certificates the gold standard that dealers and collectors trust most. If you’re buying colored gemstones, GIA gives you two certificate options: a basic identification report or a more detailed version that includes origin information.
The International Gemological Institute (IGI) also does excellent work, especially if you’re buying in India, the Middle East, or Europe. They focus heavily on protecting consumers and make sure their reports clearly identify what you’re getting and disclose any treatments. Many retail jewelers prefer IGI certificates because they’re thorough yet accessible for everyday buyers.
How Certification Actually Affects Your Wallet
Here’s something that might surprise you: certified gemstones typically sell for 20-30% more than similar-looking uncertified stones. That might sound like you’re paying extra for a piece of paper, but certification gives you several valuable guarantees:
- Proof that your stone is natural and not synthetic or treated (unless disclosed)
- Professional quality assessment you can trust
- Documentation your insurance company will accept
- Transparency that helps you make smart buying decisions
If you ever want to sell or upgrade your stone, certification becomes even more important. Most dealers won’t even consider buying uncertified gemstones because they can’t verify what they’re getting. Certification creates the trust and transparency that keeps the global gem trade running smoothly.
FAQs
Q1. How do gemologists distinguish between natural and synthetic gemstones?
Gemologists use various techniques including visual inspection, microscopic examination, and specialized equipment. They look for inclusions, color zoning, and other characteristics unique to natural stones. Synthetic gems often have too-perfect color distribution and lack the natural inclusions found in earth-formed stones.
Q2. What role does color play in gemstone identification?
Color is fundamental in gemstone identification. Gemologists assess the hue, tone, and saturation of a stone under different lighting conditions. They also look for color zoning patterns, which are often indicators of natural formation. Spectroscopic analysis provides additional color-based evidence for identification.
Q3. Why is the Mohs hardness scale important in gemology?
The Mohs hardness scale, ranging from 1 (softest) to 10 (hardest), helps gemologists determine a stone’s resistance to scratching. This information is crucial for distinguishing between similar-looking gems and assessing a stone’s durability for jewelry use. It’s a quick, non-destructive test that provides valuable data for identification.
Q4. What are some common tools used by gemologists?
Gemologists use a variety of tools including jeweler’s loupes, microscopes, diamond testers, and spectroscopes. They also employ specific gravity liquids, UV lamps for fluorescence testing, and refractometers. These instruments help in detailed examination and provide objective data for gemstone authentication.
Q5. How does gemstone certification impact value and resale?
Certification from reputable labs like GIA or IGI significantly impacts a gemstone’s value and resale potential. Certified stones typically command 20-30% higher prices than uncertified ones of similar appearance. Certification provides authentication against synthetics or treatments, quality assurance, and documentation for insurance purposes, making stones more desirable in the market.